Sales Request For Authorized Price
Users may need to adjust pricing below authorized minimums (shown in the minimum multiplier column). Use the Request Authorized Pricing process to gain approved pricing before placing an order with the lower price.
Procedures in this Job Aid:
a. Multiplier Definitions
b. Optimize Multipliers
c. Deal Score
You can update the multipliers on one or multiple line items in the Edit Items tab by clicking Update Multipliers in the Multipliers section.
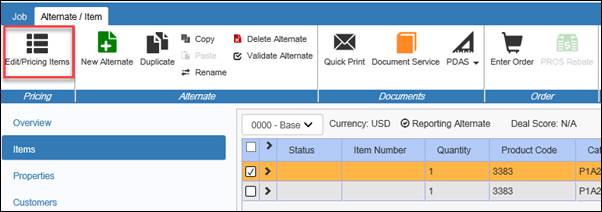
1. Click Edit Items in the Alternate/Item tool bar.
2. Select
![]() and
determine what sales multipliers you want to use for your selected items.
and
determine what sales multipliers you want to use for your selected items.
a. Select the sales multiplier you want to update
b. Optionally mark your intention to add a specific percentage increase or decrease and input the percentage.

Multiplier Definitions


Optimize Multipliers
There are multiple options to help the sales user set Sales multipliers
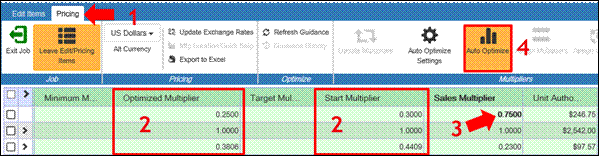
1. All Multiplier options are being moved to the Pricing Tab for all users, new buttons providing price scope functionality
2. Start and Optimized Multipliers come from real time price analysis and updates
3. You will notice that your sales multiplier is automatically populated to start and right off the bat this is a good price
4. Auto optimized is enabled by default for the Sales user and this will set the Sales Multiplier based on the product start multiplier. As you add items and the job size grows your multipliers will adjust down, if you don’t like this change you can click a disable button and make multiplier adjustments manually
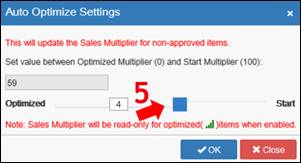
5. Finally, auto optimized settings update the sales multipliers for all non-approved items, you can use the slider to set the value between Optimized and Start multipliers
Deal Score
The Deal Score reveals how close pricing decisions have been to the Optimized Price or target. A deal score of 50 means that the average of all your pricing decisions are equal to the Optimized Price. If you are above 50 you are pricing higher than the optimized price and will see increased revenue, below 50 you are cutting prices too much. The percentage next to the deal score tells you what portion of your current order is optimized.
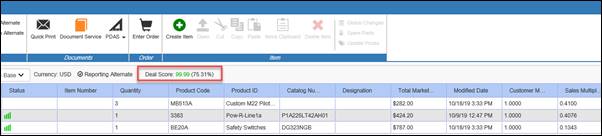
The following list shows what deal score numbers equate to.
Above Start Multiplier = Deal Score of 100
Start Multiplier = Deal Score of 90
Target (Optimized) Multiplier = Deal Score of 50
Floor = Deal Score of 10
Below Floor = Deal Score of 0
Step 2: Request Authorization
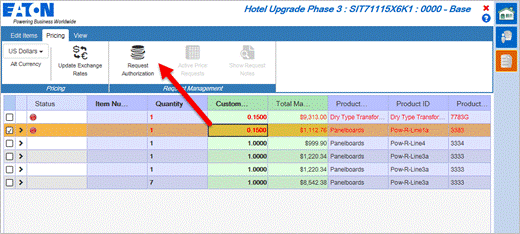
1. In the Pricing top tab of the Edit Items screen, click Request Authorization.
2. Verify the job information and select Competition, Distributor, and End User/Contractor.

6. If
needed, click on the search symbol ![]() to
find a Distributor or End User/Contractor.
to
find a Distributor or End User/Contractor.
3. Select a recently used customer or search for a different one.
4. Select a customer from the list on the left side and click on the Add + to move it into the column on the right.
5. In the Notes field, tell the product line why the special pricing is needed.
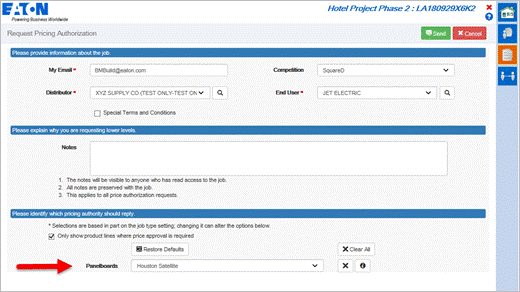
6. For each Product Line, choose a pricing authority in the drop-down menu.
Note: In the Properties tab of the job, change the job type to Conventional and SPY will show more options in the Product line list for approval.
7. Confirm the information is correct and click Send.
A Product Line representative will review the authorization request using the Price Request Management view. Monitor the authorization status with the Price Request Management view or by viewing the alternate in the job.
Check the Status of the RFQ
7. Click the Price Request Management view on the Bid Manager home screen.

8. Filter the requests using the options on the left side of the window.
Status |
Description |
Pending Response |
Requests that have been submitted, and are awaiting a response |
Response Waiting |
Requests that have been responded to, and awaiting your acceptance |
Closed |
These are requests that have been accepted |
Cancelled |
These are requests that have been cancelled |
Note: District level geography filtering is available. Districts are listed in the same area as all other geographies.
Note: Select the Grid View at the top of the screen to view the requests in a spreadsheet type view. Items in Gold require user action, and items in Grey do not require action. Request for Authorization will be Green when requesting a price and the Request for Authorization will be Blue when it’s a request for a quote.
Step 4: Accept Authorized Price
Once the Product Line responds to a RFQ, open the job to Accept or resubmit the request.
1. Click the Price Request Management view.
2. Filter the requests using the options on the left side of the window to find the RFQ.
3. Click the Grey job tile to view pricing within the job.
Status |
Description |
Pending Response |
Requests that have been submitted, and are awaiting a response |
Response Waiting |
Requests that have been responded to, and awaiting your acceptance |
Closed |
These are requests that have been accepted |
Cancelled |
These are requests that have been cancelled |
Note: Click the Details link for more information. The Details view will show requested and accepted multipliers.
4. The job will open to the Edit Items screen, click the Pricing top tab, then click Review Response, and click Accept to apply approved multipliers.
5. Review the response to your pricing request.
· Click Accept to copy the approved multipliers.
OR
· Click Exit to return to the Edit Items screen and click Cancel Request for Authorization to make a new request.