Pricing Management Tool (PMT)
The pricing management tool (PMT) is used to add, delete and/or manage product codes, catalog numbers, list prices and target and minimum multiplier levels. A limited number of Eaton employees have access to this tool.
Minimum and Target multiplier rules that are entered in the price management tool are applied based on the job geography. Users can see this geography by opening the job in Bid Manager and clicking on the properties tab.
Pricing Managers will set two types of optimized pricing in the PMT.
1. Eaton Optimized Pricing – Products having pricing adjustments that reflect the job geography or region they are being sold to. These pricing adjustments are based on Eaton pricing historical data and are marked with the ![]() symbol.
symbol.
2. 3rd Party Optimized Pricing - Products having pricing adjustments that reflect the job geography or region they are being sold to but with pricing adjustments based on 3rd party historical data. These products are marked with the ![]() symbol.
symbol.
Pricing rules are applied from most detailed to broadest. The system checks first to see if there’s a rule that is still in effect for the zone-district-office that is set for the job. If there is no rule, then it checks to see if there’s a rule that wasn’t expired for zone-district. If no rule applies, it checks zone. Zone rules are literal: for example, rule 1400 will only apply to someone in zone 1400, not to users in 1461, 1462, 1463 etc. Likewise, the rules are applied first based on Catalog Numbers. If there are no Catalog Number rules that apply, the system checks to see if there are applicable rules based on the product code.
Procedures in this Job Aid:
· Add PMT tool to Bid Manager
· View 3rd Party Optimized Tab
· Edit Item Multipliers
· Add New Product Codes and Catalog Numbers
Add the PMT tool to Bid Manager
1. From the Bid Manager home screen, click Screen Setup.
2. In the Tools tab, select Pricing Management.
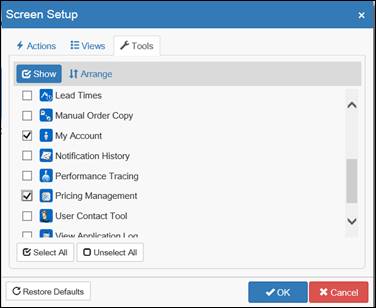
3. Click OK.
4. The Pricing Management tool will now be on the home screen Tools section.
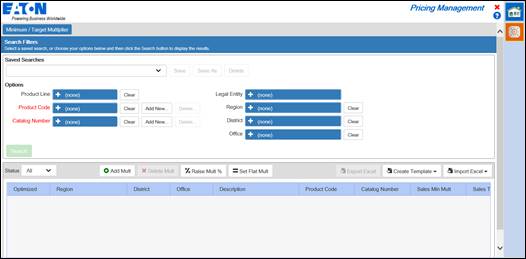
To work with existing products or prices, you must search for them first. The default search tab will be the Minimum/Target Multiplier tab. This tab will show products that don’t have optimized pricing and RES-C products that have been Eaton Optimized ![]() .
.
1. Search Filters can be saved for future reference to make searching easier. After a search is created, use the Save button and name it. You can select previously saved searches from the Saved Searches drop down menu.
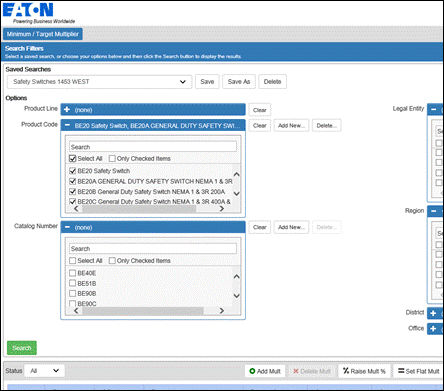
2. Select the Product Line or Product Code from the search options. Optionally, you can narrow the results by selecting the Legal Entity, Region, District, and Office.
Note: The Catalog Number search dropdown menu will display any catalog numbers that are associated with the Product Line and Product Code selections.
3. By default, when no items are selected in the search options, the search will return “all”. To search specific product codes, catalog numbers, regions, etc., click on the plus symbol to expand the search option and use the check mark boxes to select.
4. Click Search to run a search with the selected filters.
![]()
5. The results for the search will be displayed below the search parameters. Scroll down to see the results.
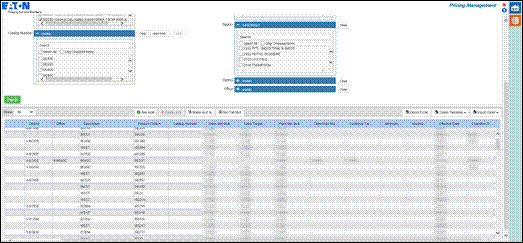
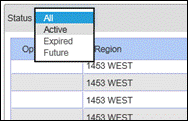
6. Optionally, select the Status drop down at the top right corner of the line item grid, and select a filter for All, Active, Expired, or Future. The default status will be ‘All’, and will reset to All after every search.
Products that have been assigned optimized pricing are not available for viewing or searching the default Minimum/Target Multiplier tab as they are only searchable through the 3rd Party Optimized tab. The 3rd Party Optimized tab is available to anybody that has product lines that have received 3rd party pricing optimization ![]() otherwise, this tab will not be available.
otherwise, this tab will not be available.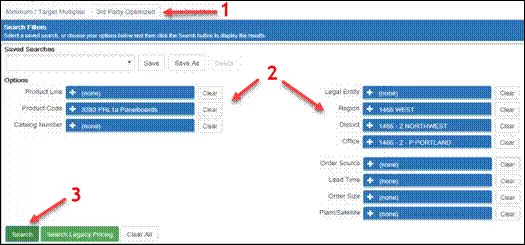
Edit Item Multipliers
1. To make changes to a line item, select it by clicking anywhere on that line. The selection will be highlighted in orange.
45
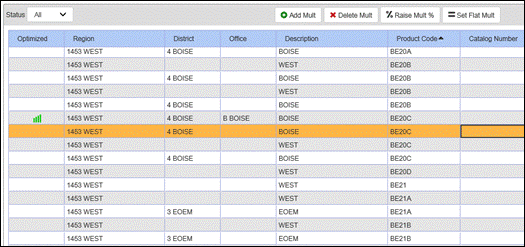
2. Use the buttons at the top of the item grid to choose what type of modification will be set for the highlighted item.
3. Double-clicking on a line item will open the Edit Multiplier window.

Important: Optimized pricing can be selected here if you are currently set up for Optimized pricing.
4. When the Edit Multiplier dialogue box appears, select a Region, District, and Office from the drop-down menus.
Important: If there an Office multiplier that expires, the hierarchy will default to the next highest geography level. If there is no multiplier in a hierarchy, the multiplier will default to a 1.0.
5. Enter a minimum multiplier and a target multiplier.
6. Choose an effective date at least one day in the future.
Important: An Expiration date is not required, however if an expiration date is added and the line item expires with no replacement multiplier, the multiplier will default to 1.0.
7. Click Save.
Add or Delete Existing Multipliers
1. Search for a Product code or Catalog number and select it.
2. The selection will be highlighted in orange.
3. Click Add Mult to change or add multipliers for the highlighted item.
![]()
4. Click Delete Mult to remove the multipliers for the highlighted item.
![]()
Apply a Percent Change to Existing Multipliers
1. Search for a Product code or Catalog number and select it.
2. The selection will be highlighted in orange.
3. Click Raise X% to make a percentage change to the multiplier.
![]()
4. When the Raise X% dialogue box opens, enter a Multiplier Change percentage.
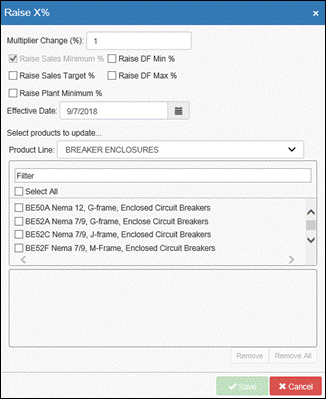
5. Select an Effective Date.
6. Select the Product Line from the drop down menu.
7. Use the check boxes to select which multipliers will be affected.
8. Click Save.
Set Flat Multipliers for Specific Location(s)
1. Search for a Product code or Catalog number and select it.
2. The selection will be highlighted in orange.
3. Click Set Flat Mult button.
![]()
4. When the Set Flat Multiplier dialogue box opens, enter the multiplier information, select the region, and then select the products.
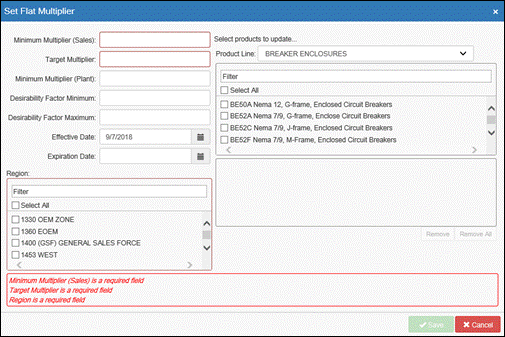
5. Click Save.
Add New Product Codes and Catalog Numbers
If a new product code and catalog number are added to a Bid Manager takeoff, pricing parameters can be set by adding the new product codes and catalog numbers in the pricing management tool.
1. Click Add New next to the Product Code or Catalog Number field.
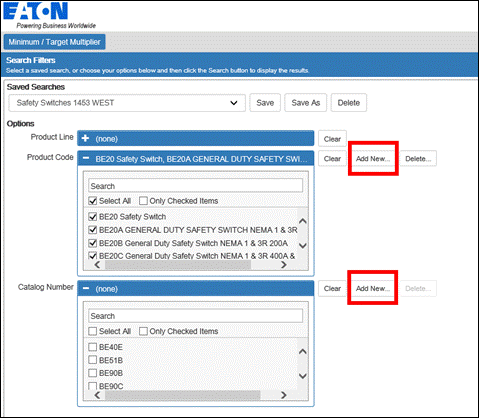
2. Enter the Product Code (or Catalog Number if you selected the Add New next to Catalog Number).
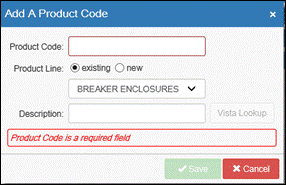
3. Select if this is existing or new with the radio button.
4. Select the associated product line from the Product Line dropdown menu.
5. Enter a description, and click Save.
A list of multipliers for a filtered item list can be exported from the pricing management tool as an Excel spreadsheet. The spreadsheet can then be modified and imported back into the pricing management tool.
1. Search or select a saved search.
2. At the top right of the item grid list, select Export Excel.
![]()
3. The Excel spreadsheet will be automatically downloaded with all the items that are present in the item grid list (from the search results).
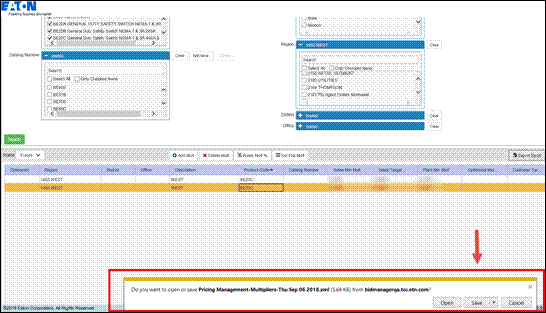
4. A File Download dialogue box will open asking whether to open or save the file. Click Open or Save from the dialogue box. Depending on what internet browser you are using this may look different.
5. Open the excel spreadsheet on your computer.
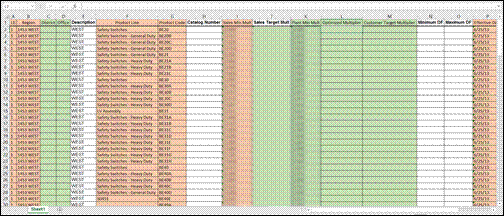
Note: We have highlighted the columns here for explaining them, however the columns will all appear as white background normally.
6. The columns in the image above that are in Orange are required columns for normal pricing. The columns in green are required for Optimized pricing.
|
Standard Multiplier Pricing Required Columns |
Optimized Pricing Required Columns |
|
LE |
LE |
|
Region |
Region |
|
|
District |
|
|
Office |
|
Product Line |
Product Line |
|
Product Code |
Product Code |
|
Sales Min Mult |
|
|
Sales Target Mult |
|
|
|
Plant Min Mult |
|
|
Optimized Multiplier |
|
Effective Date |
Effective Date |
7. Changes can be made to individual fields by overtyping within them. If changes are made to an existing field, ensure that the effective date for the same row is in the future.
8. A new line with different pricing parameters can be added without changing existing pricing. Use an existing line as a template; copy it to the next empty row at the bottom of the spreadsheet.
9. Paste the selection into the last empty line in the spread sheet.
10. Modify the new line item as needed. Ensure that the effective date is in the future.
11. Save the excel spreadsheet and close it.
12. Go back to the Price Management tool in Bid Manager, click Import Excel
![]()
Note: (September 2018) There is a known issue with uploading the multiplier template, an error will occur unless all cells to be uploaded have some formatting such as adding a border to them.
13. Select the Excel spreadsheet from the Windows Explorer window that appears.
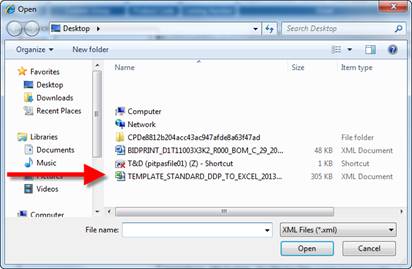
14. Click Open.
15. The item grid list will display the imported spreadsheet items.