Price a Job
After adding products/items to an alternate, pricing is authorized and/or updated in the Edit Items screen. Newly created items/takeoffs will always have the latest pricing. Previously saved items require the user to open and re-save the takeoff to update pricing.
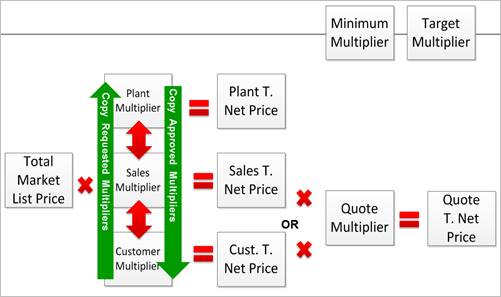
Prices from the configurated product are shown as a Total Market List Price. This price is manually adjusted (depending on the user type) by the Plant, Sales, and Customer Multiplier to become the Plant, Sales, and Customer Total Net Price. End user prices are then adjusted using the Quote Multiplier(NA)/3rd Party Multiplier(EMEA).
Procedures in this Job Aid:
· Access the Edit Items Screen
· Change Views and Columns in Edit Items
· Optimized Pricing Multipliers
· Updating Optimized Pricing Multipliers
· Changing Optimized Pricing Multipliers
· Change Currency in Edit Items
· Apply Multipliers (depending on user type)
· Copy Pricing to a Spreadsheet and Printing
· Printing the Edit Items Screen
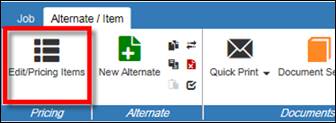
1. Open the desired job. For more information, see Open Existing Jobs.
2. Using the Overview left side tab select the desired alternate. The Items left side tab will display.
3. On the Home top tab, click Edit Items
Change Views and Columns in the Edit Items Screen
1. In Edit Items screen, click the View tab on the top left of the screen.
2. The ribbon bar displays several choices for changing the view of the edit items screen.

Change the Column Setup
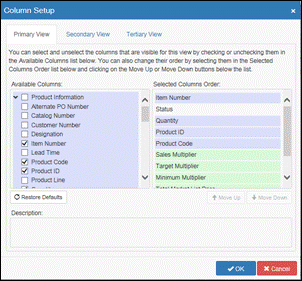
Column Setup allows customization of the Primary View, Secondary View and Tertiary View buttons. These are defaulted to recommended views for the user types. Three different column sets can be changed and saved on the edit items screen.
a. Click Column setup
b. The Column Setup window opens. Click on the Primary View, Secondary View, or Tertiary View tab to be changed.
c. On the left Available Columns pane select all the columns to appear for the view selected. A check mark will appear beside the selected items. Select or deselect all values in a category by clicking on the bolded value.
d. Arrange the order of those columns by moving them up or down in the right Selected Columns Order pane by clicking the Move Up or Move Down buttons.
e. Click Restore Default Columns to reset the columns to their default setting.
f. Click OK to set the column selections for that view.
Note: Once in the edit items screen further adjustments can be made by dragging and dropping columns to in the desired order from left to right.
Change the way items are grouped in rows
There are also four Product View buttons that change the grouping of item rows. Click any of these buttons to change the way items/rows are grouped from top to bottom. When grouped, change multiple line item multipliers at one time.
· All Items: Displays all line items individually
· Product Code: Groups items by Product Code
· Product Line: Groups Items by Product Line
· Takeoff: Groups Items by Product Takeoff

The Bid Manager Version column in the Edit Items screen represents the version of the Bid Manager used to create the item. The version number can be used for Order Entry version verification. (See the Price a Job instructions for more information)

Optimized Pricing Multipliers (Internal Eaton, US Only)
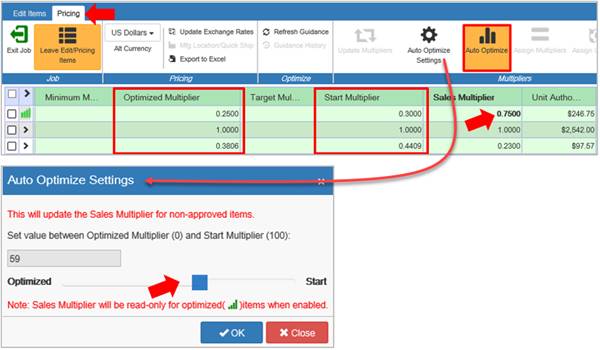
Updating Optimized Pricing Multipliers (Internal Eaton, US Only)
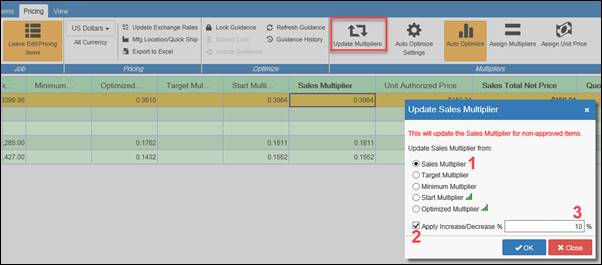
You can update the multipliers on one or multiple line items in the Edit Items tab by selecting the Update Multipliers button in the Multipliers section.
Note: The numbers below match the numbers in the screen shot.
1. Select the sales multiplier you want to update
2. Optionally mark your intention to add a specific percentage increase or decrease
3. Input the correct percentage
Changing Optimized Pricing Multipliers (Internal Eaton, US Only)
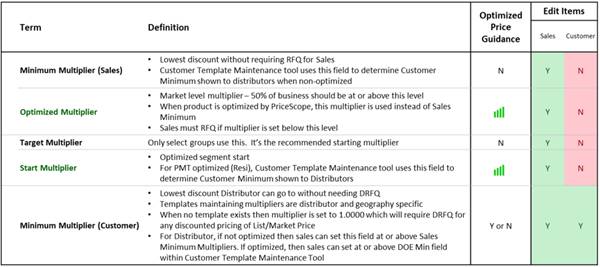
· All Multiplier options are available on the Pricing Tab for all users, including options for products with Optimized Pricing
· Optimized, Start and Target Multipliers are defined based on historical sales and are updated monthly. The Sales Multiplier is automatically populated with the start multiplier, which is set to a 50 percentile of successful sales price for that specific segment.
· Auto optimized is enabled by default for the Sales user. This will update the Sales Multiplier to the product start multiplier as the job conditions change i.e. more products are added (when the job size grows the multipliers will adjust down), market geography adjustments (end customer or purchasing entity changes).
a. To stop the automatic update of the optimized multipliers, click Auto Optimize
· The plant can view additional reports and details related to market price optimization by clicking on the green optimized status Icon or blue icon if it is eaton optimized
· When Auto Optimized is off, click Auto Optimize Settings and make multiplier adjustments manually, this button is enabled only when Auto Optimized is disabled
a. You can adjust your optimization via the sliding scale tool
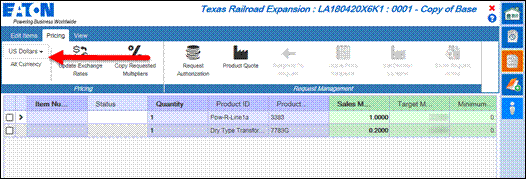
Change the Currency in Edit Items
Change the currency for the selected alternate at any time by using the Alt Currency drop down menu.
1. In the Pricing top tab, choose a currency from the Alt Currency drop down menu.
2. Update the currency exchange rate information to the latest Eaton exchange rates at any time by clicking the Update Exchange Rates button.
A complete bill of material must have item numbers.
1. To Assign Item Numbers, click the button on the Edit Items top tab.
2. Or, manually type them in.
Note: In the Documentation Service, Tab 2, select to organize your documents by item number or power flow. Manually assigning items in edit items will allow you to print them in a specified order.
3. Click Explode Items when there are product lines will only accept a single quantity per line item.
Note: Product configurations and Quantities can still be edited; however, Items will need to be exploded before Order Entry.
Apply Multipliers (depending on user type)
To adjust a Total Net Price, enter a value in the appropriate Multiplier column. Plant, Sales, and Customer user types each have respective Multiplier columns. Total Market List Price multiplied by the Plant/Sales/Customer Multiplier equals the Plant/Sales/Customer Total Net Price column. Users may also have a Minimum and Target Multiplier columns to use as a reference. In addition, certain user types may enter a Quote Multiplier(NA)/3rd Party Multiplier(EMEA), which increases the Plant/Sales/Customer Total Net Price to calculate the Quote Total Net Price. The Quote Total Net Price is printed in the Document Services Package and is shown to end users. Quotes that are older than 30 days will be required to update pricing before order entry.
Edit Item screen numbers follow these rules:
· Any number shown in bold may be changed by the user.
· Multipliers are shown in blue
· Calculated values are shown in black.
· Multipliers will turn red if they fall below the approved Minimum Multiplier.
1. Depending on the user type, enter a value in the Plant, Sales, or Customer Multiplier column. Values less than 1 will reduce the Plant, Sales, or Customer Total Net Price. Values greater than 1 will raise the price.
2. When the value in the Plant, Sales, or Customer Multiplier column is less than the value in the minimum Multiplier column, it will turn red. This indicates the price requires approval to quote the customer or place an order. Refer to the Request Authorized Pricing job aid for more information.
3. The Plant/Sales/Customer Total Net Price will calculate automatically (Total Market List Price x Multiplier = Total Net Price).
4. Optionally, enter a value in the Plant/Sales/Customer Total Net Price column, and the multiplier will back calculate.
5. Optionally, enter a value greater than 1 in the Quote Multiplier(NA)/3rd Party Multiplier(EMEA). This calculates the Quote Total Net Price, which is showing to end users in the Document Services Package.
The Edit Items screen may be exported to a spreadsheet for you to review and edit as needed. There is no method at this point to import any changes made on that spreadsheet however.
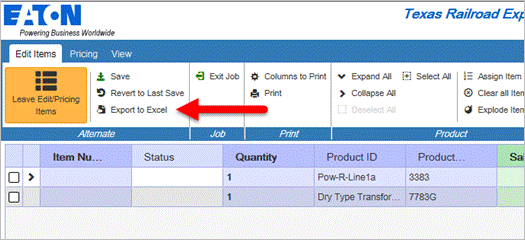
1. In the Edit Items top tab, click on the Export to Excel to get a spreadsheet with all visible columns and items in the Edit Items screen.
2. Open a spreadsheet application (Excel) on your computer.
Printing the Edit Items Screen
Printing the edit items screen can be accomplished with several different output types.
1. From the Edit Items top tab, click Screen Print for a static screenshot of the edit items screen. The Screen Print is limited to 50 lines and 20 columns.
2. From the Edit Items top tab, click Columns to Print to select what columns will be visible in the output of the Print option.
3. From the Edit Items top tab, click Print to see an HTML output of the edit items screen (this will open a new tab in the internet browser window). To print this to a printer, use the internet browser option or CTRL+P on your keyboard.
Lock in Pricing (EMEA Region Only)
At any time, pricing can be locked so the date, configuration, exchange rate, and Market Multiplier will be applied to the current alternate for 30 days.
1. From the Edit Items top tab screen, click the Lock Quote Date button.
2. Click the plus sign to expand the Lock Quote Date Notes to read the parameters.
3. Click Lock Quote.
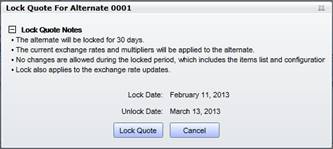
4. Once the alternate lock date is in effect, then no changes can be made to the alternate unless the user creates a new alternate and copes the items from the locked alternate to the one just created.
When pricing is complete, click the Leave Edit Items button in the Edit Items top tab to save values and return to the job view.

Related Topics:
· Create a Job
· Create an Alternate
· Create an Item
· Request Authorized Pricing