
Create a Job
Jobs, also called Negotiations, or “Negs”, contain customer, marketing, documentation, product, and pricing information for orders. Jobs can have one or more bills of material, called “alternates”, in Bid Manager. Although you can configure a product/item in Bid Manager without first creating a job, the product/item must be associated with a job to be saved.
Procedures in this Job Aid:
· Completing and Saving the Job
1. In the Actions section of Bid Manager Home page, click the Create Job button.
2. When the Create Job form appears; the Properties section is selected by default.
Note: Required information is denoted by red asterisks *.
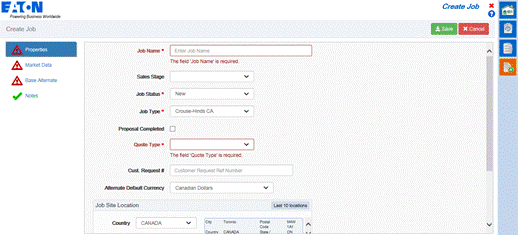
3. Complete the form by entering the:
· Job Name: Job naming should be consistent with the outlines provided by your leadership. Generally, the job name will contain the name provided by the end user and a location or job number.
· Sales Stage: The sales stage here is the same Sales Pipeline as found in Customer 360.
· Job Status: Denotes the progress of the job through the order cycle. Bid Manager will automatically update this field when RFQ (Bid) or Order Entry (Obtained) is requested, requiring additional information.
|
Job Status |
Definition |
|
New |
Default for new jobs. (this will change automatically to “Bid” if special pricing is requested) |
|
Budget |
Quick job creation with few required fields. |
|
Bid |
All information needed to complete a Bid Package for a customer. |
|
Awarded |
Customer has committed to buying from Eaton. |
|
Obtained |
Eaton has obtained a formal purchase order. |
|
Lost/Abandoned |
Self-Explanatory |
· Job Type: Ensure that this is selected to the business segment that you are quoting.
· Proposal Complete: Select this option if applicable.
· Quote Type: Select either Project or Stock.
· Customer Request Number: If the quote type “Project” is selected, input is required for this field. This can be a PO number from the customer or any other identifier for the project.
· Alternate Default Currency: When creating new alternates, they will default to this currency.
· Job Site Location: Provides basic information on the geographic location of the job. If the quote type “Project” is selected, input is required for this field. Enter the Country, City, State/Province, and Postal code.
Note: State/Province must be abbreviated (Example: New York = NY). Postal Code is case sensitive and if a space is normally required, it will need to be included.
1. Click and open the Market Data section.
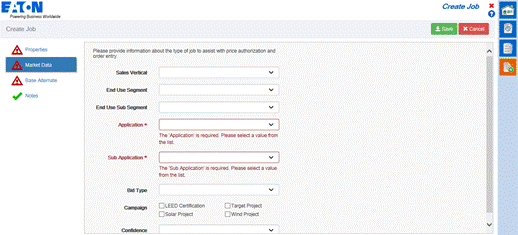
2. Enter the following:
· Sales Vertical: Eaton Business segment
· End Use Segment: The products and job specifics will define the end use segment
· End Use Sub Segment: Same as above
· Application (Building Type): Identifies how the job will be classified
· Sub Application: further defines the application
· Bid Type: The bid type represents how the bid will be created.
· Campaign options: Identifies key opportunities Eaton wants to track.
· Confidence: Likelihood of securing the project.
|
Confidence |
Description |
|
0% |
Budgetary or not to be included in the pipeline due to customer uncertainty of project |
|
10% |
Opportunity is unfunded; Long timeline; Poor relationship with customer. |
|
25% |
Know about an opportunity. Success is possible but unlikely or it is very early in the sales process. |
|
50% |
Could go either way |
|
60% |
Success is more likely than not but significant risks are still present with significant questions on how effective risk can be mitigated. |
|
70% |
Good progress is being made. We have line of sight to success with the majority of the risks identified and mitigation plans identified. |
|
80% |
The opportunity is progressing well and is likely to happen. Key risks have been identified and mitigation plans are in place with organizational commitment for appropriate support to effectively deal with them. Risks still exist and it should be expected that some opportunities with this confidence level won't materialize. |
|
90% |
Opportunity is highly likely to happen. All signs indicate the opportunity will convert to a sale and the organization needs to start making plans to support this business. All the t's aren't crossed and I's aren't dotted but success is imminent short of any unforeseen circumstances. |
|
100% |
Won! This opportunity will become a reality. |
· Synergy Customer: Choose this option if the customer was not previously available prior to the merger with Eaton.
The Base Alternate is the first alternate that will be created automatically for the job. (An “Alternate” is synonymous with “bill of material”). Multiple bills of material can be created within one job, therefore they are called Alternates, or Alternate Bills of Material.
1. Click and open the Base Alternate section.
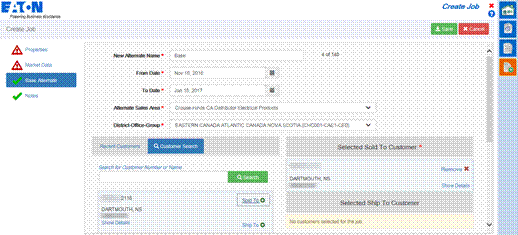
2. The New Alternate Name of the first alternate will default as “Base”. This can be changed at any time until the alternate is sent to SAP.
3. Select the Valid From Date and the Valid To Date by clicking on the date field or clicking on the calendar icon next to the field.
4. Alternate Sales Area will match the users sales area. Some users may have more than one option. This selection should match the area that the product is being sold in. Submit a ticket to the IT Service Helpdesk requesting a change if this is incorrect.
5. District Office Group will determine what customers are available to quote under each region.
6. To add a Recently Used customer or Customer in the Search list, first select the customer tile from the left and then use the Add + button to add the customer information to add to the Sold to Customer area. Ship to Customer is not required.
7. If searching for a customer, click the Search tab, type in at least 3 letters of the customer name, or Account Number and click the Search button. You can also use the Remove X button next to the customer name to remove it.
1. Click and open the Notes section.
2. To add a note, click the + Add Note button.
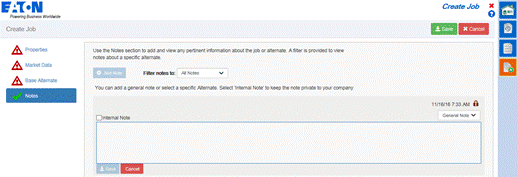
3. Optionally, click the drop down menu to add a General Note to the job, or select a specific Alternate.
4. Check the Internal Note box if you want the note to only share with coworkers who have access to the job within your organization. (External sharing will exclude those notes with the check mark.)
1. When the job information has been completed, click Save.
2. After the job is saved, Bid Manager displays the job in Edit Mode. This means that the only the person that has this job open in Edit Mode can save changes to the job. Others may view the job in Read Only mode while the job is being edited.
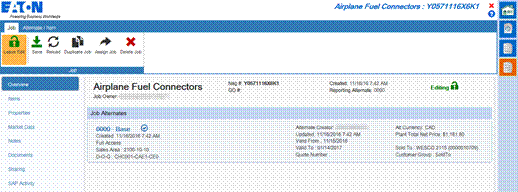
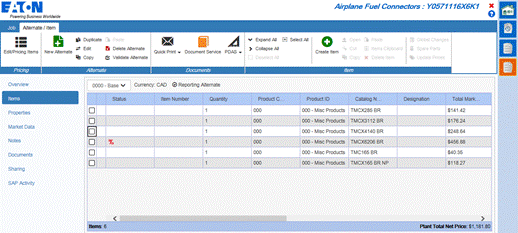
3. By default, the Overview left side displays with a default “Base” alternate Bill of Material. Clicking on this alternate will activate the Items left side tab, where products/items can be added.
4. All other populated fields can be viewed and edited in the left side tabs.