
Print Documents in Bid Manager
There are two methods for printing documents in Bid Manager: Quick Print and Documentation Service
· The Quick Print function allows the user to print a bill of material, bid manager drawings, and price sheet.
· The Documentation Service is designed to assist with compiling job related documents from one or more job alternates together into a complete PDF document package. External documents can be added into this package, and many standard documents are available for selection. The compiled PDF document can be downloaded from the documentation service server using a link provided via email.
Procedures in this Job Aid:
· Set Defaults for Displaying Pricing in Document Package and Quick Print
Quick Print allows you to quickly send or receive a bill of material and approval drawings. Bid Manager will email a bill of material in Word format or Excel depending on the document, and the approval drawings in PDF.
1. Open an existing job alternate
1. On the Home top tab, click the Quick Print button.
2. Enter your email address,
3. Choose the documents to attach
4. Click the Orange Lighting bolt button to send.
5. Check for an email from ManualNotification@eaton.com, Bid Manager Documentation Service (Quick Print). Open the email and save the attachments to your computer.
Step 1: Open the Documentation Service
There are two ways to open the documentation service; from the home screen of Bid Manager, or within a job. If you access it from the home screen, you must specify a job you want to print.
1. Click on Create Document Package from Actions area in the home screen.

2. Or, find and open a job.
3. Click on an existing alternate from the Overview left side tab.
4. Click on the Document Service button in the Home top tab.
Step 2: Enter the Job Information
1. When the Document Service is accessed through the job screen, the alternate that was selected will be listed first. To add an additional Bill of Material (Alternate) to the documentation service, type a General Order (GO) Number, Negotiation (Neg) Number, Job Name, or Sales ID in the Add job search field and press the search button.
Note: To remove alternates, click on the trashcan icon next to the alternate name.
2. In the search results, place a check mark next to the alternates to include them in the document package.
Note: The Data Location column displays the location where the job is stored. Jobs are listed in White rows, and Orders are shown in Green rows. If a job shows up in multiple data locations, all copies of that job are shown.
3. Change the Job Reporting (Quote Type and Status) and Regional Settings (Language and Currency Format) in this tab as well.
Step 3: Select Documents
In Tab 2 of the documentation service, the document package can be customized to include specific documents.
1. Optionally, select a Standard Document Package. Standard Document Packages apply a template of documents to the document package that can be further customized using the choices below it.
Note: If you select Full Bid or Quick Bid, you will be required to complete the information in the Enter Additional Information tab on the right side because a proposal letter will be included that requires an Addressee.
2. Customize the package by using the drop down menus next to each document type and changing the selection.
|
Main Documents |
Action |
|
Proposal Letter |
Select the type of proposal letter. |
|
Title Page |
Select a title page format. |
|
Table of Contents |
Select with or without page numbers. |
|
Combined Bill of Material for All Items |
Select None or a level of detail for the combined Bill of Material that will be included in the front of the document as opposed to the more popular Product Line Bill of Material. |
|
Selling Policy |
Select None or a Selling Policy. |
|
Comments and Clarifications |
Select None or Standard |
|
Product Line Specific |
Action |
|
Separate Bill of Material by Product |
Select a level of detail for the Bill of Material - Detailed (used most frequently), Intermediate, Summary or None. |
|
Drawings |
Select a type of drawing format. Note: this drives what is printed on the Bidman drawings. |
|
Literature |
Select a type of literature: Submittal: Technical Data folder Submittal & Instructions: Adds the product line instruction IL in a folder. O&M: Instruction, Component, Renewal parts folders. O&M & Technical Data: Adds Technical Data folder to the above |
|
Document Package Specific |
Action |
|
Product Line Pages |
Select to be included. This includes a page with the Product Line name, such as Panelboards. |
|
Product Line Table of Contents |
Select standard with or without page numbers. |
|
Sub tab Pages |
This provides a Tab page with the folder names (as selected under Literature) Small Projects Template: For submittals, only included the Technical Data sub tab. |
|
Literature Divider Pages |
Puts an Eaton Logo blank page between different literature items. |
|
Maximum Binder Size |
Select a binder size for printing. Binder size will limit the number of pages in the pdf and create multiple volumes per the selection. (3 inch is the default) |
Note: To show a price in the document package, a Bill of Material must be selected in the Main Documents and the Document Formats must be selected to show price in the My Account tool.
Note: The Table of Contents tab on the right side shows the documents that will be included in the package and the order that they will appear.
Step 4: Configure the Package
In Tab 3, rearrange, customize or delete documents selected in Tab 2. Folders can be added to group documents. External documents can also be added in this tab.
1. The left section of the window displays the folder structure of the package. The middle pane shows the documents inside the folder selected on the left.
2. Select a document in the middle pane, and use the buttons in the ribbon bar to configure the document package.
Note: ![]() The red warning icon next to the Main Documents folder indicates that there is additional information to complete before submitting the document package.
The red warning icon next to the Main Documents folder indicates that there is additional information to complete before submitting the document package.
|
Button Group |
Button Name |
Description |
|
Package |
Save
Reset |
Save the package in order to return to at a later time. Packages can be saved for each type. Note: Only one save per type. Resets any saved package and returns to default choices. |
|
Edit |
Cut Paste Rename Folder Rename Job |
Cut a folder or document Paste the cut folder or document Rename the selected folder. (E.g. Panelboard Spec Section 16492) Provides 3 lines of text (50 characters each) to replace the Job name in all references. |
|
Actions |
Add Folder
Add File Replace Preview
Apply Placeholder |
Add a Product Line Folder to be customized by user. Add a file from a local drive Replace selected item with another Preview document (Documents can be previewed in XPS) When a plant drawing is missing, a placeholder is available. This is a global placeholder selection. This can be changed on an item level basis as well. |
|
Display |
Expand Collapse |
Expand the folder view Collapse the folder view |
|
Re-Arrange |
Move up/down Move top/bottom |
Move by one line at a time Move to the extreme top or bottom of order |
3. Documents can easily be moved from folder to folder by dragging and dropping.
4. Select or unselect items with the check mark box next to the item to include or remove the document in the final package.
5. External files can be added into the document package by using the Add Document button. Files will be added into the folder that is currently selected. The file name of the document added will appear on the Bill of Material.
6. Select a document and click the Preview button to see a preview of that document.
Note: Documents loaded in formatter on classic Bid Manager jobs will show in the Technical Documents folder. If the plant has loaded drawings, the item folder will end with the number of drawings and the title of the plant release type: Approval, Confirmation, Construction, or Final.

7. If plant drawings have been requested for an Item during order entry, but no drawings are available, a warning triangle ![]() will appear in front of the item. This triangle indicates some form of placeholder is required. A placeholder type must be defined to submit the package. A Placeholder inserts a page with the item number and designation.
will appear in front of the item. This triangle indicates some form of placeholder is required. A placeholder type must be defined to submit the package. A Placeholder inserts a page with the item number and designation.
· Placeholder – Inserts a placeholder page.
· Bidprint drawings - inserts the bidprint drawings from Bidmanager.
· Bidprint BOM - inserts the bidprint Bill of Material from Bidmanager.
· Bidprint BOM + Drawings - inserts both the bidprint Bill of Material and drawings from Bidmanager.
The placeholder page has a red border to indicate something is missing:
Step 5: Submit the Package
In tab 4 of the documentation service, additional information may be required before submitting the package that information will be highlighted in red. The document package will be created in a PDF format that will be available for download via a link provided in an email response. If the package is less than 5MB it can be requested as a pdf attachment in the email with the link. The document package will be available for 72 hours using the provided link. After 72 hours, you will need to resubmit the package as links cannot be refreshed.
1. Enter the email address to which the document package link will be sent to. Additional email recipients can be added here, or the email with the link can be forwarded after it has been received and reviewed.

Note: Missing file placeholders are included when a file or drawing cannot be retrieved from Enovia. These are different placeholders than on Tab 3 for drawings not yet available.
2. Use the radio buttons to choose to receive the final document as a link only or as a pdf and a link.
Note: Files over 5MB will only be sent as a link.
3. In the Enter Additional Information tab under the Customer Information, Bid Manager imports the customer information that was selected when the job was created. To populate the customer information fields with a customer that was originally added to the job, click on that customer name from the Current Selections tab. To add new customer information to the document package, click on the Search tab.
4. Fill out all required fields that are titled in red.
5. Click the Submit button.
![]()
Note: If the submit button is grey and unavailable; information may be missing from the previous tabs. If information has been entered in the past, Bid Manager will attempt to auto populate the fields when text is being entered.
Email Response and PDF Document
The email response from the submitted document request will include a link where the document is available for download for 72 hours. This link can be forwarded to any desired recipient.
Links to the files (volumes) that have been formatted for printing will show according to how the document binder size was selected.
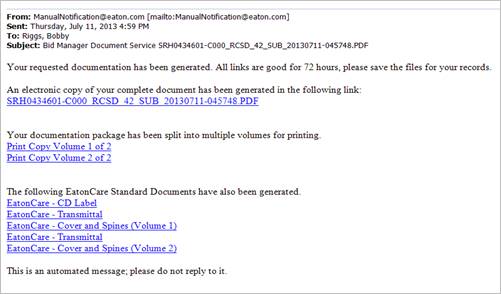
· The electronic copy shown above for a submittal combines all volumes into one file.
· The electronic copy for an O&M removes the blank pages and combines all volumes into one file.
· The rest of the links are for use in printing a document.
Set Defaults for Displaying Pricing in Document Package and Quick Print
You can control which price prints on a Bill of Material, and at what level the price is displayed.
1. In the Home screen, click the My Account button.
2. Click on the Document Formats tab.
3. The Document Formats tab allows you to choose the pricing information and which level of the bill of material will appear on a bill of material from Quick Print and Document Services. Select from the options listed in the table below:
|
Document |
Drop Down Options |
|
Quick Print Pricing |
No Pricing Information – Creates a BOM without a printed price. Quote Price – Displays the price for the end customer Market List – Displays a takeoff price without any multipliers applied. |
|
Quick Print BOM Level |
Summary – Creates a BOM with the job information, item numbers, quantity, product family, product description, catalog numbers, and designations. Intermediate - This option will only be different for certain products. Otherwise this is option is the same as Summary. Detailed – Creates a BOM with all the information from the Summary & Intermediate BOMs plus a list of materials broken down by item. |
|
Document Service Pricing |
No Pricing Information – Creates a BOM without a printed price. Quote Price – Displays the price for the end customer Market List – Displays a takeoff price without any multipliers applied. |
4. Click Save.
5. Close the My Account screen.
After submitting a request for a Document Package, Quick Print, or PDAS file package the Document Print Queue shows where the request is in the Documentation Service Print Queue.
1. Add the Print Queue tool to your Bid Manager homepage (See Navigate Bid Manager and Customize the Homepage job aid for more information).
2. On the Bid Manager homepage, click the Document Print Queue button.

3. When the Document Print Queue opens, you can find your requests by entering the
· Requestor Sales ID (Bid Manager ID, which is also the first four characters of a Neg Number).
· Locator (GO# or Neg#)
· Start Date (Date the document service was requested)
4. Click the Search button to execute the search.
5. Search results can be grouped by Date, Requestor, or Locator.
6. Search results can be exported to Microsoft Excel.